168
PRICE LIST
09
RACCORDI A COMPRESSIONE CON O-RING PER TUBO PE/PEHD/PEX
COMPRESSION FITTINGS WITH O-RING FOR PE/PEHD/PEX PIPE
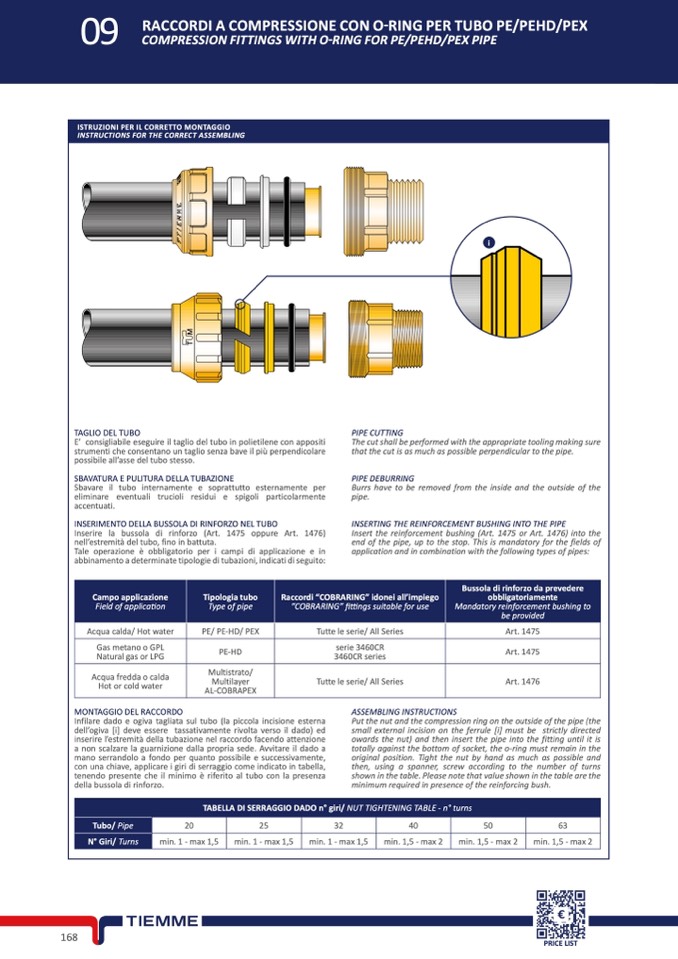
ISTRUZIONI PER IL CORRETTO MONTAGGIO
INSTRUCTIONS FOR THE CORRECT ASSEMBLING
TAGLIO DEL TUBO
PIPE CUTTING
E’ consigliabile eseguire il taglio del tubo in polietilene con appositi
strumenti che consentano un taglio senza bave il più perpendicolare
possibile all’asse del tubo stesso.
The cut shall be performed with the appropriate tooling making sure
that the cut is as much as possible perpendicular to the pipe.
Burrs have to be removed from the inside and the outside of the
pipe.
INSERTING THE REINFORCEMENT BUSHING INTO THE PIPE
Bussola di rinforzo da prevedere
obbligatoriamente
Mandatory reinforcement bushing to
be provided
Art. 1475
Art. 1475
Art. 1476
SBAVATURA E PULITURA DELLA TUBAZIONE
PIPE DEBURRING
Sbavare il tubo internamente e soprattutto esternamente per
eliminare eventuali trucioli residui e spigoli particolarmente
accentuati.
INSERIMENTO DELLA BUSSOLA DI RINFORZO NEL TUBO
Inserire la bussola di rinforzo (Art. 1475 oppure Art. 1476)
nell’estremità del tubo, fino in battuta.
Tale operazione è obbligatorio per i campi di applicazione e in
abbinamento a determinate tipologie di tubazioni, indicati di seguito:
Insert the reinforcement bushing (Art. 1475 or Art. 1476) into the
end of the pipe, up to the stop. This is mandatory for the fields of
application and in combination with the following types of pipes:
Campo applicazione
Tipologia tubo
Raccordi “COBRARING” idonei all’impiego
Field of application
Type of pipe
“COBRARING” fittings suitable for use
Tutte le serie/ All Series
serie 3460CR
3460CR series
Tutte le serie/ All Series
Acqua calda/ Hot water
Gas metano o GPL
Natural gas or LPG
Acqua fredda o calda
Hot or cold water
MONTAGGIO DEL RACCORDO
PE/ PE-HD/ PEX
PE-HD
Multistrato/
Multilayer
AL-COBRAPEX
Infilare dado e ogiva tagliata sul tubo (la piccola incisione esterna
dell’ogiva [i] deve essere tassativamente rivolta verso il dado) ed
inserire l’estremità della tubazione nel raccordo facendo attenzione
a non scalzare la guarnizione dalla propria sede. Avvitare il dado a
mano serrandolo a fondo per quanto possibile e successivamente,
con una chiave, applicare i giri di serraggio come indicato in tabella,
tenendo presente che il minimo è riferito al tubo con la presenza
della bussola di rinforzo.
ASSEMBLING INSTRUCTIONS
TABELLA DI SERRAGGIO DADO n° giri/ NUT TIGHTENING TABLE - n° turns
Tubo/ Pipe
20
25
32
40
50
63
N° Giri/ Turns
min. 1 - max 1,5 min. 1 - max 1,5 min. 1 - max 1,5 min. 1,5 - max 2 min. 1,5 - max 2 min. 1,5 - max 2
Put the nut and the compression ring on the outside of the pipe (the
small external incision on the ferrule [i] must be strictly directed
owards the nut) and then insert the pipe into the fitting until it is
totally against the bottom of socket, the o-ring must remain in the
original position. Tight the nut by hand as much as possible and
then, using a spanner, screw according to the number of turns
shown in the table. Please note that value shown in the table are the
minimum required in presence of the reinforcing bush.
i

