Installazione di un camino
L’installazione di un camino/canna fumaria inizia dalla
sua parte inferiore con il punto di partenza della stessa.
È necessario scegliere se partire da terra con un elemento
con scarico laterale, o dall’alto con una mensola di sostegno
a parete. Dopo la partenza si prosegue installando gli
elementi che comporranno la canna fumaria e che sono,
dal basso verso l’alto:
Elemento T con tappo d’ispezione - raccordo T, pari
diametro o ridotto, per il collegamento alla caldaia, (prima
d’installare il T accertarsi della misura dell’uscita caldaia
dal pavimento) - elemento di controllo fumi o di prelievo
fumi, a seconda della potenza del generatore e del
combustibile bruciato - elementi lineari - e gli accessori:
faldali, terminali, collari di fissaggio a parete, da scegliere
sul nostro catalogo generale.
Vi è la possibilità di avere uno spostamento dall’asse
verticale, in questo caso si devono usare le curve a 30°
o 45° con, interposto, un elemento lineare o regolabile a
seconda della misura da realizzare.
Nell’intubamento, molto spesso, si calano dall’alto gli
elementi necessari alla formazione della canna fumaria.
Per questo speci
fico lavoro è consigliato usare un collare
di centratura, ben fissato sotto la nervatura del lato
maschio, al quale ancorare le funi necessarie alla calata
degli elementi successivi. Ulteriori altri collari di centratura
(distanziali) dovranno essere fissati lungo il tragitto, almeno
uno ogni tre metri.
Con qualsiasi combustibile e generatore il senso dei fumi
ha la femmina rivolta sempre verso l’alto.
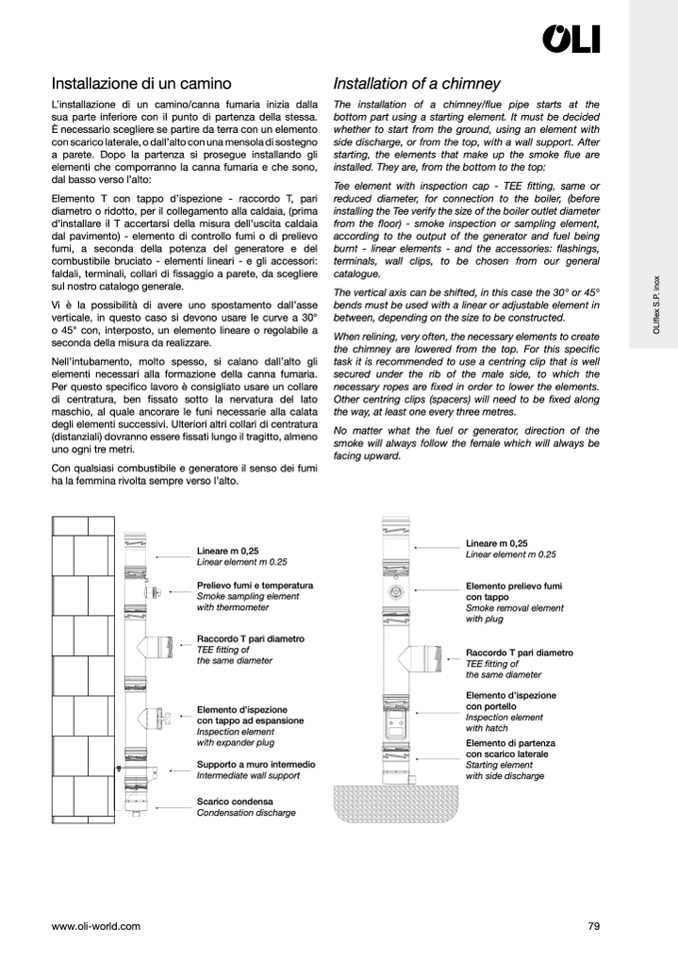
Lineare m 0,25
Linear element m 0.25
Prelievo fumi e temperatura
Smoke sampling element
with thermometer
Raccordo T pari diametro
TEE fitting of
the same diameter
Elemento d’ispezione
con tappo ad espansione
Inspection element
with expander plug
Supporto a muro intermedio
Intermediate wall support
Scarico condensa
Condensation discharge
Installation of a chimney
The installation of a chimney/flue pipe starts at the
bottom part using a starting element. It must be decided
whether to start from the ground, using an element with
side discharge, or from the top, with a wall support. After
starting, the elements that make up the smoke flue are
installed. They are, from the bottom to the top:
Tee element with inspection cap - TEE fitting, same or
reduced diameter, for connection to the boiler, (before
installing the Tee verify the size of the boiler outlet diameter
from the floor) - smoke inspection or sampling element,
according to the output of the generator and fuel being
burnt - linear elements - and the accessories: flashings,
terminals, wall clips, to be chosen from our general
catalogue.
The vertical axis can be shifted, in this case the 30° or 45°
bends must be used with a linear or adjustable element in
between, depending on the size to be constructed.
When relining, very often, the necessary elements to create
the chimney are lowered from the top. For this specific
task it is recommended to use a centring clip that is well
secured under the rib of the male side, to which the
necessary ropes are fixed in order to lower the elements.
Other centring clips (spacers) will need to be fixed along
the way, at least one every three metres.
No matter what the fuel or generator, direction of the
smoke will always follow the female which will always be
facing upward.
Lineare m 0,25
Linear element m 0.25
Elemento prelievo fumi
con tappo
Smoke removal element
with plug
Raccordo T pari diametro
TEE fitting of
the same diameter
Elemento d’ispezione
con portello
Inspection element
with hatch
Elemento di partenza
con scarico laterale
Starting element
with side discharge
www.oli-world.com
79
O
L
I
f
l
e
x
S
.
P
.
i
n
o
x

