ISTRUZIONI DI MONTAGGIO SET DI PRELAVAGGIO
ASSEMBLY INSTRUCTIONS FOR PRE-RINSE SET
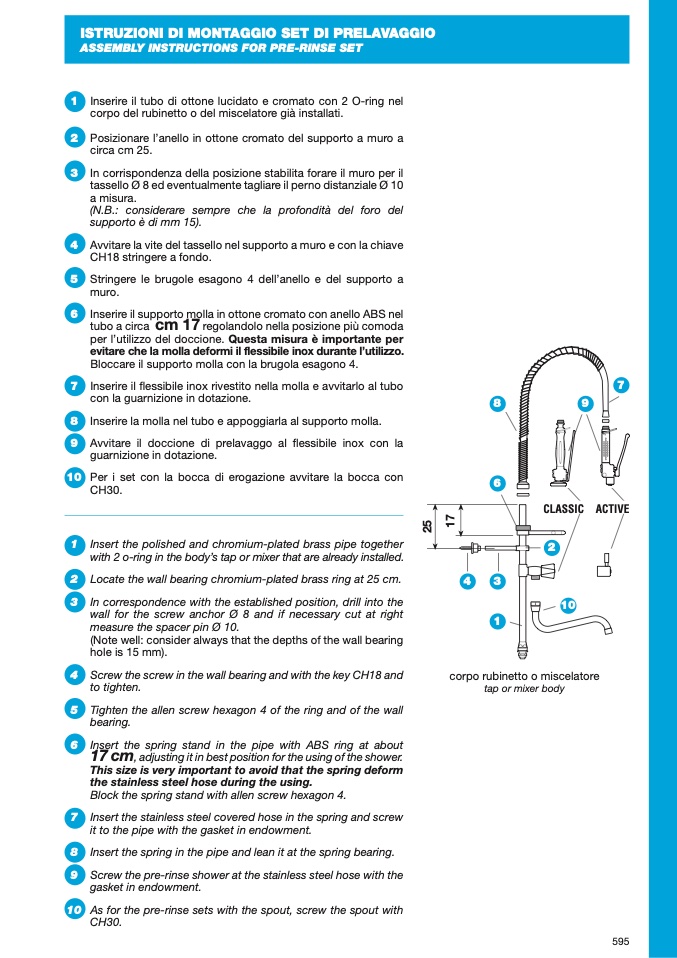
1 Inserire il tubo di ottone lucidato e cromato con 2 O-ring nel
corpo del rubinetto o del miscelatore già installati.
2 Posizionare l’anello in ottone cromato del supporto a muro a
circa cm 25.
3 In corrispondenza della posizione stabilita forare il muro per il
tassello Ø 8 ed eventualmente tagliare il perno distanziale Ø 10
a misura.
(N.B.: considerare sempre che la profondità del foro del
supporto è di mm 15).
4 Avvitare la vite del tassello nel supporto a muro e con la chiave
CH18 stringere a fondo.
5 Stringere le brugole esagono 4 dell’anello e del supporto a
muro.
6 Inserire il supporto molla in ottone cromato con anello ABS nel
tubo a circa
cm 17 regolandolo nella posizione più comoda
per l’utilizzo del doccione. Questa misura è importante per
evitare che la molla deformi il flessibile inox durante l’utilizzo.
Bloccare il supporto molla con la brugola esagono 4.
7 Inserire il flessibile inox rivestito nella molla e avvitarlo al tubo
con la guarnizione in dotazione.
8 Inserire la molla nel tubo e appoggiarla al supporto molla.
9 Avvitare il doccione di prelavaggo al flessibile inox con la
guarnizione in dotazione.
10 Per i set con la bocca di erogazione avvitare la bocca con
CH30.
1 Insert the polished and chromium-plated brass pipe together
with 2 o-ring in the body’s tap or mixer that are already installed.
2 Locate the wall bearing chromium-plated brass ring at 25 cm.
3 In correspondence with the established position, drill into the
wall for the screw anchor Ø 8 and if necessary cut at right
measure the spacer pin Ø 10.
(Note well: consider always that the depths of the wall bearing
hole is 15 mm).
4 Screw the screw in the wall bearing and with the key CH18 and
to tighten.
5 Tighten the allen screw hexagon 4 of the ring and of the wall
bearing.
6 Insert the spring stand in the pipe with ABS ring at about
17 cm, adjusting it in best position for the using of the shower.
This size is very important to avoid that the spring deform
the stainless steel hose during the using.
Block the spring stand with allen screw hexagon 4.
7 Insert the stainless steel covered hose in the spring and screw
it to the pipe with the gasket in endowment.
8 Insert the spring in the pipe and lean it at the spring bearing.
9 Screw the pre-rinse shower at the stainless steel hose with the
gasket in endowment.
10 As for the pre-rinse sets with the spout, screw the spout with
CH30.
7
8
9
6
4
3
1
CLASSIC ACTIVE
2
10
corpo rubinetto o miscelatore
tap or mixer body
595
2
5
1
7

