Istruzioni di montaggio
Sistema a cartellare / Flanging system
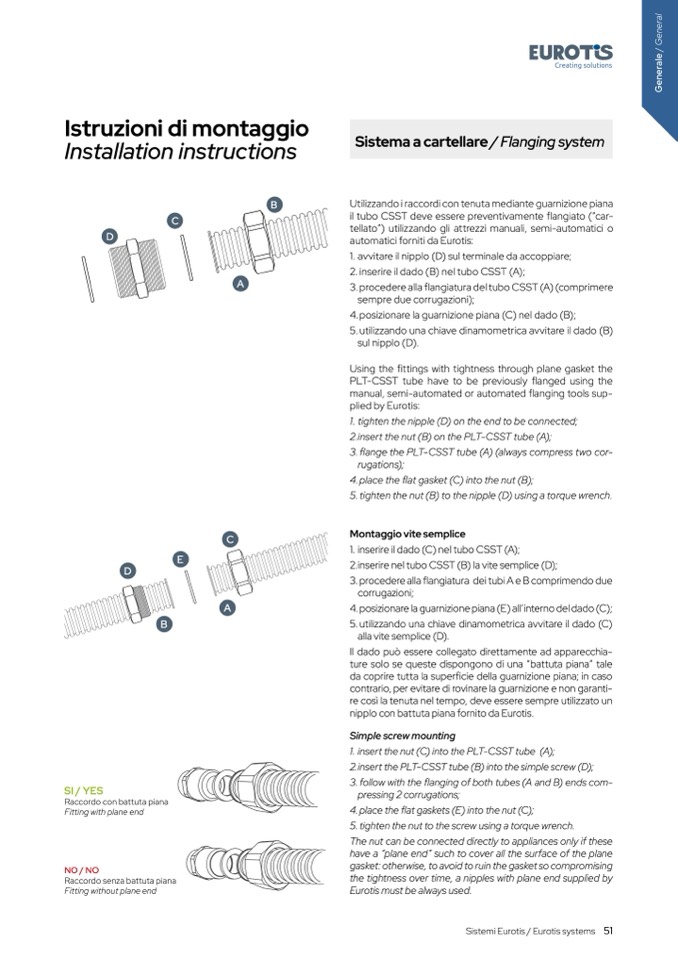
Utilizzando i raccordi con tenuta mediante guarnizione piana
il tubo CSST deve essere preventivamente flangiato (“car-
tellato”) utilizzando gli attrezzi manuali, semi-automatici o
automatici forniti da Eurotis:
1. avvitare il nipplo (D) sul terminale da accoppiare;
2. inserire il dado (B) nel tubo CSST (A);
3. procedere alla
flangiatura del tubo CSST (A) (comprimere
sempre due corrugazioni);
4. posizionare la guarnizione piana (C) nel dado (B);
5. utilizzando una chiave dinamometrica avvitare il dado (B)
sul nipplo (D).
Using the
fittings with tightness through plane gasket the
PLT-CSST tube have to be previously
flanged using the
manual, semi-automated or automated
flanging tools sup-
plied by Eurotis:
1. tighten the nipple (D) on the end to be connected;
2.insert the nut (B) on the PLT-CSST tube (A);
3.flange the PLT-CSST tube (A) (always compress two cor-
rugations);
4. place the
flat gasket (C) into the nut (B);
5. tighten the nut (B) to the nipple (D) using a torque wrench.
Montaggio vite semplice
1. inserire il dado (C) nel tubo CSST (A);
2.inserire nel tubo CSST (B) la vite semplice (D);
3. procedere alla
flangiatura dei tubi A e B comprimendo due
corrugazioni;
Installation instructions
C
D
B
A
E
D
B
A
4. posizionare la guarnizione piana (E) all’interno del dado (C);
5. utilizzando una chiave dinamometrica avvitare il dado (C)
alla vite semplice (D).
Il dado pu
ò essere collegato direttamente ad apparecchia-
ture solo se queste dispongono di una “battuta piana” tale
da coprire tutta la super
ficie della guarnizione piana; in caso
contrario, per evitare di rovinare la guarnizione e non garanti-
re cos
ì la tenuta nel tempo, deve essere sempre utilizzato un
nipplo con battuta piana fornito da Eurotis.
Simple screw mounting
1. insert the nut (C) into the PLT-CSST tube (A);
2.insert the PLT-CSST tube (B) into the simple screw (D);
3. follow with the
flanging of both tubes (A and B) ends com-
pressing 2 corrugations;
4. place the
flat gaskets (E) into the nut (C);
5. tighten the nut to the screw using a torque wrench.
The nut can be connected directly to appliances only if these
have a “plane end” such to cover all the surface of the plane
gasket: otherwise, to avoid to ruin the gasket so compromising
the tightness over time, a nipples with plane end supplied by
Eurotis must be always used.
C
SI / YES
Raccordo con battuta piana
Fitting with plane end
NO / NO
Raccordo senza battuta piana
Fitting without plane end
Sistemi Eurotis / Eurotis systems 51
G
e
n
e
r
a
l
e
/
G
e
n
e
r
a
l

