INSTRUCTIONS FOR CORRECT UNDERGROUND
PLACEMENT OF ALL PLASTO UNDERGROUND TANKS
Material index of backfill and/or landfill
SOIL
SAND
CONCRETE
GRAVEL
SOIL CLAY
For the choice of backfill material and compaction methods, refer to European Standards ENV 1046 and UNI EN 1610.
REQUIREMENTS
Verify and make a preliminary evaluation of the hydrogeological and morphological
characteristics of the soil for the compatibility to lay underground the tank.
If, during the excavation, the aquifer is higher than the bottom of the tank, it is necessary to
provide a suitable insulation.
The tank must not be buried in sloping areas, and the surrounding land must not generate
unbalanced lateral forces.
The maximum depth of the excavation must not exceed 80 cm.
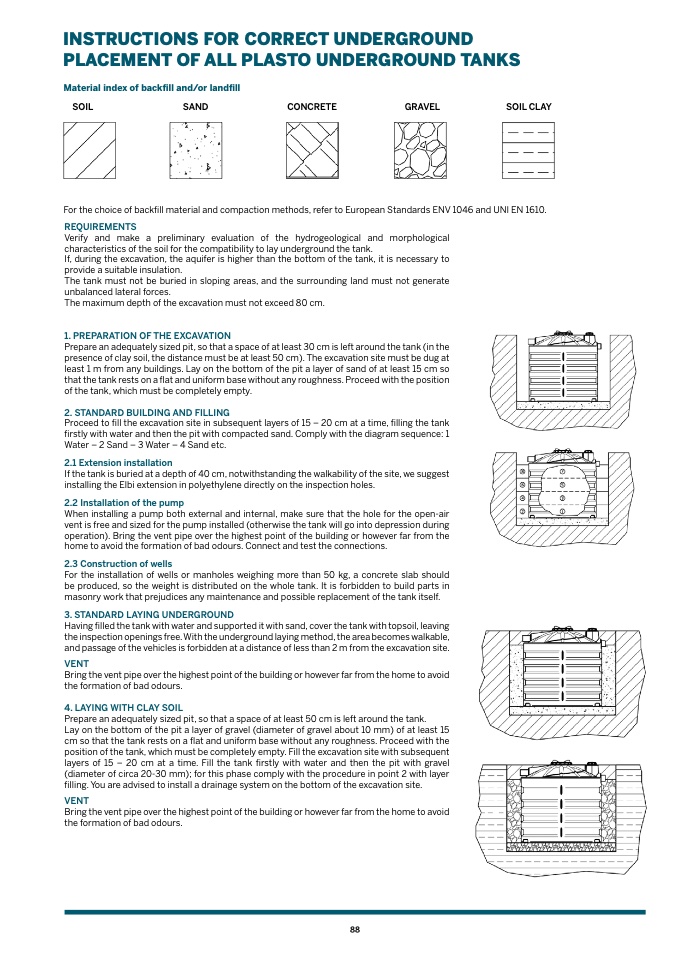
1. PREPARATION OF THE EXCAVATION
Prepare an adequately sized pit, so that a space of at least 30 cm is left around the tank (in the
presence of clay soil, the distance must be at least 50 cm). The excavation site must be dug at
least 1 m from any buildings. Lay on the bottom of the pit a layer of sand of at least 15 cm so
that the tank rests on a flat and uniform base without any roughness. Proceed with the position
of the tank, which must be completely empty.
2. STANDARD BUILDING AND FILLING
Proceed to fill the excavation site in subsequent layers of 15 – 20 cm at a time, filling the tank
firstly with water and then the pit with compacted sand. Comply with the diagram sequence: 1
Water – 2 Sand – 3 Water – 4 Sand etc.
2.1 Extension installation
If the tank is buried at a depth of 40 cm, notwithstanding the walkability of the site, we suggest
installing the Elbi extension in polyethylene directly on the inspection holes.
2.2 Installation of the pump
When installing a pump both external and internal, make sure that the hole for the open-air
vent is free and sized for the pump installed (otherwise the tank will go into depression during
operation). Bring the vent pipe over the highest point of the building or however far from the
home to avoid the formation of bad odours. Connect and test the connections.
2.3 Construction of wells
For the installation of wells or manholes weighing more than 50 kg, a concrete slab should
be produced, so the weight is distributed on the whole tank. It is forbidden to build parts in
masonry work that prejudices any maintenance and possible replacement of the tank itself.
3. STANDARD LAYING UNDERGROUND
Having filled the tank with water and supported it with sand, cover the tank with topsoil, leaving
the inspection openings free. With the underground laying method, the area becomes walkable,
and passage of the vehicles is forbidden at a distance of less than 2 m from the excavation site.
VENT
Bring the vent pipe over the highest point of the building or however far from the home to avoid
the formation of bad odours.
4. LAYING WITH CLAY SOIL
Prepare an adequately sized pit, so that a space of at least 50 cm is left around the tank.
Lay on the bottom of the pit a layer of gravel (diameter of gravel about 10 mm) of at least 15
cm so that the tank rests on a flat and uniform base without any roughness. Proceed with the
position of the tank, which must be completely empty. Fill the excavation site with subsequent
layers of 15 – 20 cm at a time. Fill the tank firstly with water and then the pit with gravel
(diameter of circa 20-30 mm); for this phase comply with the procedure in point 2 with layer
filling. You are advised to install a drainage system on the bottom of the excavation site.
VENT
Bring the vent pipe over the highest point of the building or however far from the home to avoid
the formation of bad odours.
88

